Last year, I created an inspection app for users to take pictures of equipment that will be rented out by their clients. Since this company works with oil companies, the app users find themselves in areas without reception. They would like to be able to save the data offline and upload later when they have better service. In addition, some users have limited data plans and want to only upload when they are connected to WiFi.
So in comes PowerApps offline capability.
To set this up, we will need 2 buttons. One to save the data offline and the other to save online. If the user selects upload, a flow will kick in and upload the images to SharePoint. (That is another lengthy post, addressing the complexities of uploading images to SharePoint with PowerApps. John Liu addresses the topic very thoroughly in his blog.)
When the user selects save offline, the data gets stored in a collection in a local file on the phone. Then the user can safely exit the app, without loosing the data. When they open the app again, the app will check if the local file is empty or not. If it is not empty, the data will display in the app for the user to upload.
Note of caution, you want to limit the amount of data the users can save offline as the size of the local file is limited. It varies based on the type of phone you are using.
Ok, lets get into the rules and formulas that you need to make this happen.
First off, we have a status indicator to let us know if we are connected to the internet or not. Its not really need in this app scenario but its a feature you can have so why not.
We have two controls that can display the connection status of the app. A toggle control and a label control. I am using the toggle control to check the connection and then the label control checks that outcome from the toggle control to display the appropriate text.
PowerApps now has a property to check if the app is connected: Connection.Connected
If this returns as true, the toggle will display a green color otherwise it will display as red.
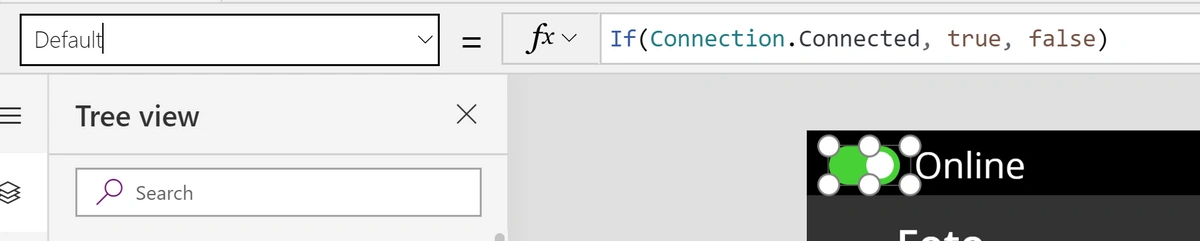
The text control, check if the toggle control value is true or false and displays the appropriate text accordingly.

Now lets set up our button controls.
The upload button is using a flow to upload the images to SharePoint using John Liu's hack to upload images to SharePoint. Read more here
The save offline button, creates a collection that I called Local_Photos and saves the data to the local file called Saved_LocalPhotos. Then, I clear the collection for All Photos, that is where the images are stored when the user takes or attaches images to the app. Next I am navigating to a new screen called local photos where the user can choose to add more photos, close the app or upload the photos.
Formula:
Collect(Local_Photos, ShowColumns(Gallery5.AllItems,"Image","Filename","Description_temp","Latitude_temp","Longitude_temp","Site_temp")); SaveData(Local_Photos, "Saved_LocalPhotos"); Clear(AllPhotos); Navigate(LocalPhotos, ScreenTransition.None)
Next, we need to create an OnStart formula, that will load the local collection and check if there is any data in it. If yes, the data will load and display in the app and take them to the Local Photos screen for them to upload their photos. If there is no local data, it will take them to the main input screen.
Select the App, from the left navigation and then select the OnStart property for the app.

Formula:
LoadData(Local_Photos2, "Saved_LocalPhotos", true); If(CountRows(Local_Photos2) > 0,Navigate(LocalPhotos, ScreenTransition.None), Navigate(InputForm1, ScreenTransition.None))
Another item, whatever mechanism you are using to upload your photos, you will need to clear the local collection once the data is uploaded to SharePoint. Once the data is uploaded, we don't need to store it locally anymore. So we are clearing the Local_Photos collection and then saving the empty collection to the local file.
Formula:
Clear(Local_Photos);SaveData(Local_Photos, "Saved_LocalPhotos")
And that is using the offline PowerApps capability!